Microsoft Entra/Azure IDP SSO configuration
You can enable SSO for an organization in Diligent One. When the required configuration is complete, you can securely access the system with your Entra ID credentials.
Before you start
Review our SSO documentation to ensure you are familiar with the setup and requirements. A user with System Admin access to your organization is required to complete the setup on the Diligent One side. See Configuring Single Sign-On (SSO).
Steps
Entra supports different ways of handling SAML authentication for new applications. These instructions use an Enterprise Application with SAML selected as the authentication method. This is the most straightforward way to set up SSO for Diligent One, and the instructions also mirror those previously used for Azure Active Directory. For more information on the Entra side of the setup, see Microsoft's Entra documentation.
- Navigate to https://entra.microsoft.com and log in to your account. You will need access to create a new application, e.g. an Application Administrator role.
- On the left side, under the Applications section, select Enterprise Applications.
- Select New Application, then click Create your own application at the top.
- Enter the desired name (e.g. Diligent One SSO) and ensure Integrate any other application you don't find in the gallery (Non-gallery) is chosen, then click Create.
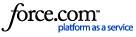
- After the app is created, select Single sign-on from the left menu, then select SAML as the method. You should see the configuration screen where you can set up all required settings like the image below.
- At the same time, open another browser tab to sign in to Diligent One as a System Admin (or work with another user who has this access).
- From the Diligent One homepage, select Platform Settings > Security Settings. If you do not see Platform Settings as an option on the Launchpad page, the account you used to sign in does not have System Admin privileges.
- Within the Single sign-on (SSO) options section, click the Set up provider button, and take note of the Custom domain entry as you will use it in each URL in the Entra configuration.
- Switch back to the Entra tab to enter required details:
- Basic SAML Configuration:
- Identifier (Entity ID) = https://accounts.diligentoneplatform.com/saml/metadata/your-custom-domain
- Reply URL (Assertion Consumer Service URL) = https://accounts.diligentoneplatform.com/saml/sso/consume/your-custom-domain
- Sign on URL = https://accounts.diligentoneplatform.com/saml/sso?custom_domain=your-custom-domain
- Relay State (Optional) = <leave blank>
- Logout Url (Optional) = https://accounts.diligentoneplatform.com/saml/slo/your-custom-domain
- Attributes & Claims
- Depending on your configuration, the default settings should work to allow authentication.
- Note that a user's email address is the unique identifier for a Diligent One account, and the default user.userprincipalname is commonly used for the name identifier. If your principal names are in a different format or an alternate address should be used, this can be changed to user.mail or any other value containing a proper valid email.
- On the Diligent One side, complete the following fields on the Single sign-on set up panel:
- Entity ID - Copy and paste the Microsoft Entra Identifier field.
- Metadata URL - <leave blank>
- Redirect Login URL - Copy and paste the Login URL field.
- Logout URL - Copy and paste the Logout URL field.
- Public certificate - Download the certificate file in Base64 format from the SAML Certificates section of the Entra configuration. Copy and paste the entire contents (including the BEGIN and END CERTIFICATE lines) into the field.
- On the bottom right, click the Enable button to save your configuration.
- With the configuration complete, you can use the Test button in the Entra configuration to try the sign-in process; make sure to log out out of Diligent One via the profile icon in the top right before testing. Users can also test using the instructions below. Note that System Admins are still able to sign in using their username and password, so if there are any issues you can adjust the configuration as necessary.
Example setup:
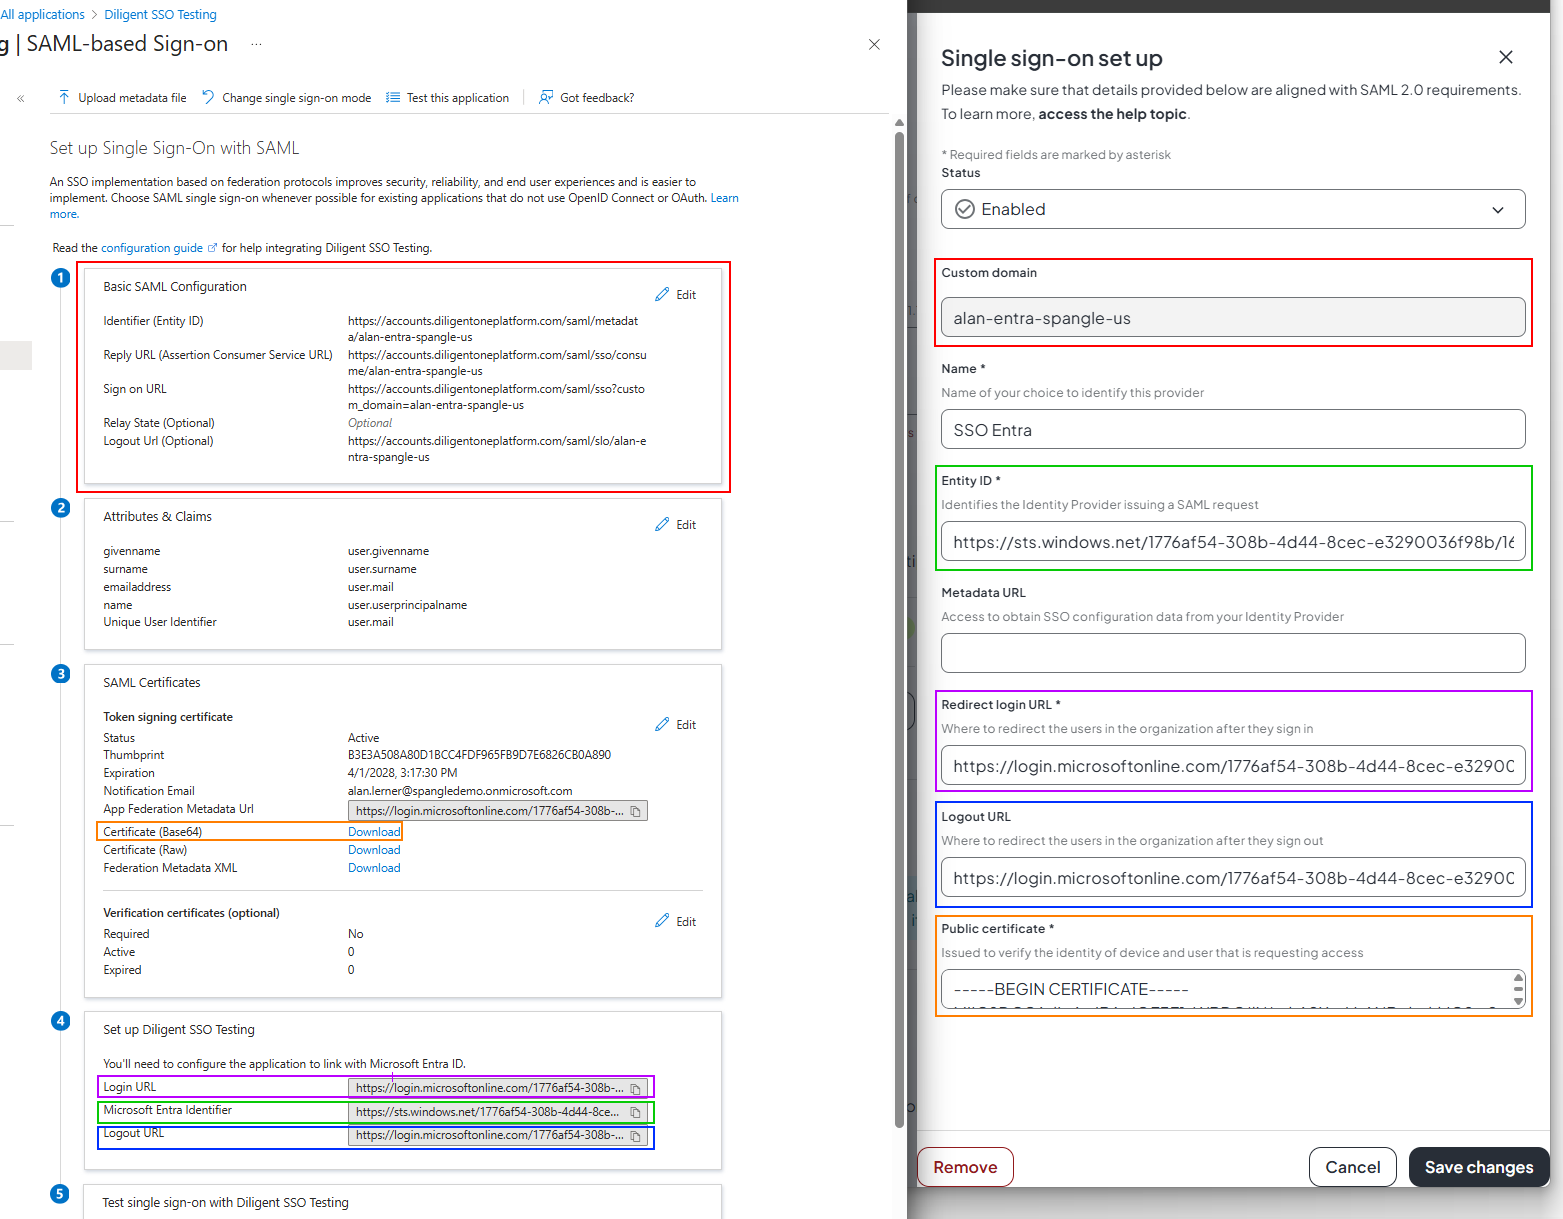
Optional: highbond.com Access
If your organization still needs the ability to access our old highbond.com domain via SSO, for example if users are still working with the Reports application, you can optionally add the highbond.com URLs to your setup. To do this in Entra, click Edit in the Basic SAML Configuration section. Use the Add identifier and Add reply URL links to add extra rows for the Identifier (Entity ID) and Reply URL (Assertion Consumer Service URL) sections. The format is the same as shown, just with highbond.com instead of diligentoneplatform.com. Save changes when done.
Signing in
Note
If users have an Entra portal with available applications, Diligent One can be selected directly from there as an alternative to manually logging in.
- Navigate to the Diligent One homepage (www.diligentoneplatform.com).
- On the sign in screen, click Continue with SSO at the bottom.
- Enter your custom domain name and click Continue.
- If not already signed in to Entra, enter your credentials and/or two-factor response as needed.
- You should be signed in successfully. Please note that the system does not support just-in-time provisioning, so if you have issues please ensure a System Admin has added your account as a user.
Tip
Users that sign in manually can bookmark the following URL to avoid entering their custom domain each time: https://accounts.diligentoneplatform.com/saml/sso?custom_domain=custom_domain
Common errors:
"The signed in user 'user@email.com' is not assigned to a role for the application"
Check on the Entra side to ensure the user has been given access to the Diligent One application, either individually or via a user group.
"User not found"
Users must be added to Diligent One by an administrator before trying to sign in through SSO. If a user has been added and the error persists, ensure their email address in Diligent One exactly matches the one used in their Entra profile.